NUMARK ORBIT
SETUP
Firmware & Drivers
Windows & Mac
No drivers are required to be installed and no firmware update is currently available. Numark Orbit is a USB Class compliant device, however always check the Numark website for any updated notifications http://www.numark.com/product/orbit
Simply connect the unit’s USB socket with a USB port of your computer, power on and let your Operating system to install the necessary drivers.
Connections
There are 2 ways to connect the Numark Orbit with your computer.
- USB
Simply connect the unit’s USB socket with a USB port of your computer, power on the unit using the side Power switcher and let your Operating system to install the necessary drivers. - Wireless
Plug the provided USB Wireless receiver to a USB port of your computer and power on the unit. Allow a couple of minutes for the pairing.
- In case the USB wireless receiver (dongle) doesn’t pair with the unit follow these steps:
- Make sure Orbit is off and the wireless USB receiver is not connected to a computer.
- Press and hold down Pad Bank Selectors 1 and 4, and then power Orbit on.
- Press the pad 16. Virtual Knob Selector K1 will flash
- Connect the wireless USB receiver to your computer within 10 seconds. Virtual Knob Selector K2 will flash.
- Press pad 12. The Virtual Knob Selectors (K1, K2, K3, and K4) will flash once to indicate Orbit is paired to the wireless USB receiver
VirtualDJ 8 Setup
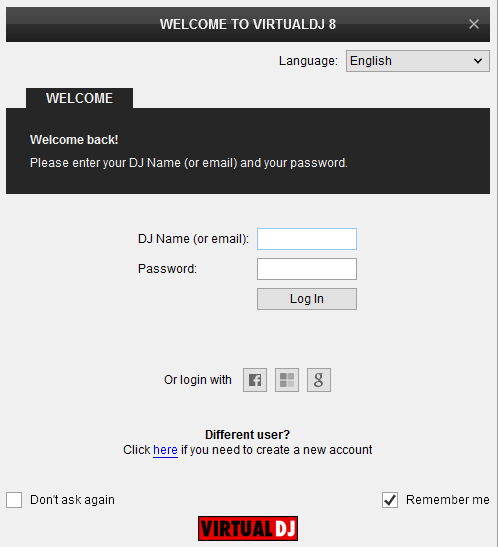
Once VirtualDJ 8 is opened, a Login Window will appear. Login with your Account’s credentials.
A Pro Infinity, a PLUS or a Pro Subscription License is required to use the Numark Orbit. Without any of the above Licenses, the controller will operate for 10 minutes each time you restart VirtualDJ.
http://www.virtualdj.com/buy/index.html
Click to OK.
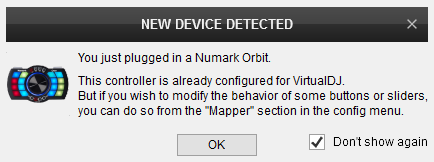
The unit is now ready to operate.
MIDI Operation
The unit should be visible in the CONTROLLERS tab of Config and the “factory default” available/selected from the Mappings drop-down list.
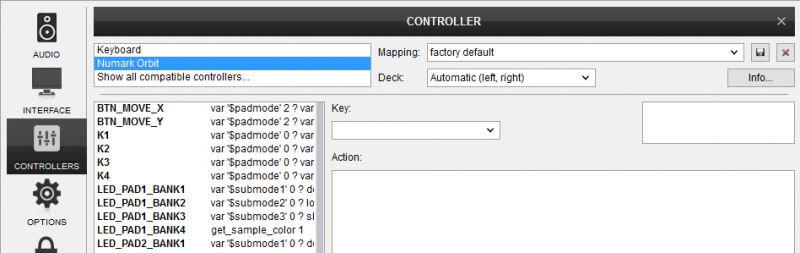
The factory default Mapping offers the functions described in this Manual, however those can be adjusted to your needs via VDJ Script actions.
Find more details at
http://www.virtualdj.com/wiki/VDJ8script.html
AUDIO Setup
The unit is not offering any built-in audio interface and VirtualDJ will use your computer’s built-in sound card by default (if not any other is chosen).
See some examples in the VirtualDJ 8 User Guide. http://www.virtualdj.com/manuals/virtualdj8/settings/audiosetup.html
For further software settings please refer to the User Guide of VirtualDJ 8.
http://www.virtualdj.com/manuals/virtualdj8/index.html
CONTROLS
The 16 Pads of the Numark Orbit offer 7 different modes, depending on the 4 PAD BANK selection buttons. Press the same PAD BANK button again to access the additional mode
Transport mode
Press the PAD BANK 1 mode button once to set the PADs to Transport mode (default mode).
Each one of the pads offers a function as shown in the pic below.
PLAY/PAUSE. Use these Pads to play/pause the left and right deck. Led will blink if paused.
CUE. When the Deck is paused, you can set a temporary Cue Point by moving the wheel to place the Audio Pointer at the desired location and then pressing the Cue Button.
During playback, you can press the Cue Button to return the track to this Cue Point. (If you did not set a Cue Point, then it will return to the beginning of the track.).
If the Deck is paused, you can press and hold the Cue Button to play the track from the Temporary Cue Point. Releasing the Cue Button will return the track to the temporary Cue Point and pause it.
To continue playback without returning to the Temporary Cue Point, press and hold the Cue Button, then press and hold the Play Button, and then release both buttons.
SYNC. Press this button to automatically match the corresponding Deck's tempo and phase with the opposite Deck's (or the Master Deck’s if using a 4 decks Skin)
PITCH RESET. If SYNC is pressed and the track has different tempo than the original, use this button to smoothly reset pitch and bring the track back to its original tempo. Led will blink while pitch is resetting.
PITCH BEND. Press and hold these buttons down to temporary speed up/slow down the song while pressed. When released, the track playback will return to the speed designated by the software Pitch Fader
CUSTOM 1-4. These buttons will trigger the actions assigned to the first 4 Custom buttons of the Default VirtualDJ skins. Use the Custom Button Editor to easily assign any actions you need to those buttons.
Wheel operation:
Press the K1 button and use the wheel to scratch (if Vinyl mode is enabled) or Bend (if Vinyl mode is disabled) the left deck.
Press the K2 button and use the wheel to adjust the Volume of the left deck.
Press the K3 button and use the wheel to adjust the Volume of the right deck.
Press the K4 button and use the wheel to scratch (if Vinyl mode is enabled) or Bend (if Vinyl mode is disabled) the right deck.
HotCues mode
While the PAD BANK 1 button is selected (Led is red), press the PAD BANK 1 mode button again to set the PADs to HotCue mode. (the PAD BANK 1 button cycles through the Transport and HotCues mode)
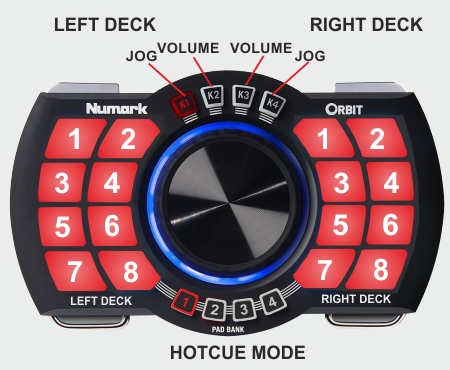
Each one of the 8 pads assigns a Hot Cue Point (1 to 8) or returns the track to that Hot Cue Point.
When a Hot Cue Button is unlit, you can assign a Hot Cue Point by pressing it at the desired point in your track. Once it is assigned, the Hot Cue Button will light up
Press the currently selected K1 to K4 button to set the Pads to Delete mode (Leds will blink) then press any of the pads to delete its assigned Hot Cue Point.
Wheel operation (same as in Transport mode):
Press the K1 button and use the wheel to scratch (if Vinyl mode is enabled) or Bend (if Vinyl mode is disabled) the left deck.
Press the K2 button and use the wheel to adjust the Volume of the left deck.
Press the K3 button and use the wheel to adjust the Volume of the right deck.
Press the K4 button and use the wheel to scratch (if Vinyl mode is enabled) or Bend (if Vinyl mode is disabled) the right deck.
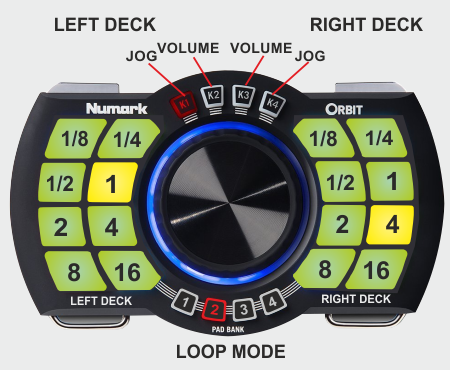
Auto Loop mode
Press the PAD BANK 2 selection button to set the Pads to Loop mode.
Each one of the 8 Pads triggers a Loop of a different size in beats (see image). When a Loop is triggered the relative Led will become yellow. Press the same pad again to disable the Loop.
Wheel operation (same as in Transport and HotCue mode):
Press the K1 button and use the wheel to scratch (if Vinyl mode is enabled) or Bend (if Vinyl mode is disabled) the left deck.
Press the K2 button and use the wheel to adjust the Volume of the left deck.
Press the K3 button and use the wheel to adjust the Volume of the right deck.
Press the K4 button and use the wheel to scratch (if Vinyl mode is enabled) or Bend (if Vinyl mode is disabled) the right deck.
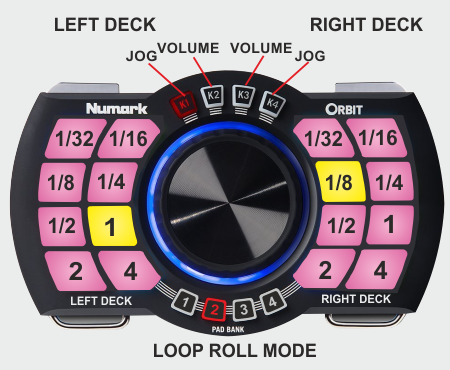
Loop Roll mode
While the PAD BANK 2 button is selected (Led is red), press the PAD BANK 2 mode button again to set the PADs to Loop Roll mode. (the PAD BANK 2 button cycles through the Loop and Loop Roll modes)
Each one of the 8 Pad triggers a momentary Loop Roll (while pressed) of a different length in beats as per the image below. When a Pad is released, the track will return to the position it would have been if the Loop Roll was never triggered.
Wheel operation (same as in Transport, HotCue and Loop mode):
Press the K1 button and use the wheel to scratch (if Vinyl mode is enabled) or Bend (if Vinyl mode is disabled) the left deck.
Press the K2 button and use the wheel to adjust the Volume of the left deck.
Press the K3 button and use the wheel to adjust the Volume of the right deck.
Press the K4 button and use the wheel to scratch (if Vinyl mode is enabled) or Bend (if Vinyl mode is disabled) the right deck.
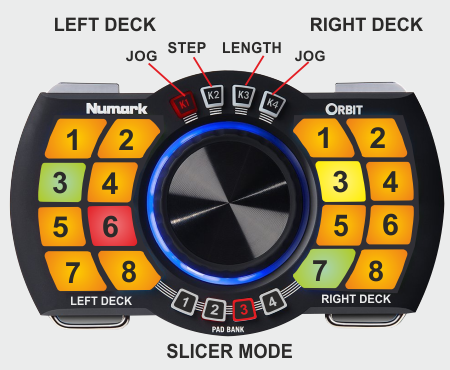
Slicer mode
Press the PAD BANK 3 selection button to set the Pads to Slicer mode.
The 8 Pads represent 8 sequential slices in the Beat Grid. The playing Slice is represented by the currently green lit pad. The green light will "move through the pads" as it progresses through each eight-Slice phrase. Press a pad to repeat that Slice (hold it down if you want to keep looping it- Led of the pressing pad will become red).
Once the Pad is released the track will continue to play from the position it would have been if the pad was never pressed.
Wheel operation::
Press the K1 button and use the wheel to scratch (if Vinyl mode is enabled) or Bend (if Vinyl mode is disabled) the left deck.
Press the K2 button and use the wheel to adjust the Step of the slices (affects both decks).
Press the K3 button and use the wheel to adjust the Length of the applied Loop on the slice (affects both decks).
Press the K4 button and use the wheel to scratch (if Vinyl mode is enabled) or Bend (if Vinyl mode is disabled) the right deck.
Effects mode
While the PAD BANK 3 button is selected (Led is red), press the PAD BANK 3 mode button again to set the PADs to Effects mode. (the PAD BANK 3 button cycles through the Slicer and Effects modes)
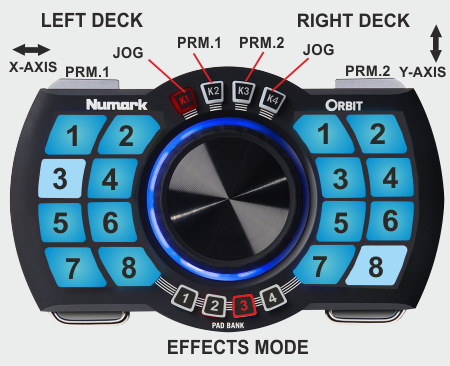
Each one of the 8 Pads triggers a momentary Effect of VirtualDJ on left or/and right decks as per the table below.
Wheel operation::
Press the K1 button and use the wheel to scratch (if Vinyl mode is enabled) or Bend (if Vinyl mode is disabled) the left deck.
Press the K2 button and use the wheel to adjust the 1st Parameter of the selected Effect (affects both decks).
Press the K3 button and use the wheel to adjust the 2nd Parameter of the selected Effect (affects both decks).
Press the K4 button and use the wheel to scratch (if Vinyl mode is enabled) or Bend (if Vinyl mode is disabled) the right deck.
X-Y Accelerometer
Alternatively Effect Parameters of the selected Effect can be adjusted using the X and Y accelerometers.
Hold the X Axis button down and then rotate the unit along the X Axis to adjust the 1st Parameter of the selected Effect.
Hold the Y Axis button down and then rotate the unit along the Y Axis, to adjust the 2nd Parameter of the selected Effect.
Both X and Y Axis accelerometers can be used at the same time.
Sampler mode
Press the PAD BANK 4 selection button to set the Pads to Sampler mode.
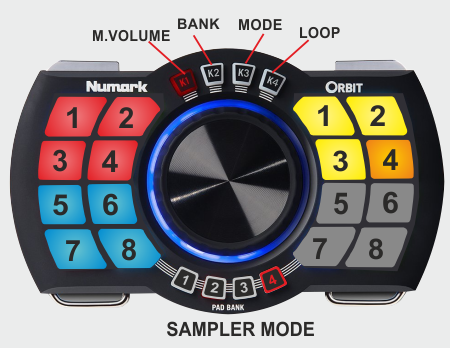
Each one of the 8 pads triggers a sample (1 to 8) from the selected Sampler Bank of VirtualDJ.
The leds of the Pads will automatically get the assigned color of each sample.
If the selected Sampler Bank has less than 9 samples, both sides of the Orbit will trigger the same samples. If the selected Bank has more than 8 samples, the left side will cotnrol Samples 1 to 8 and the right side Samples 9 to 16.
Wheel operation::
Press the K1 button and use the wheel to adjust the Master Volume of the Sampler (will affect all samples)
Press the K2 button and use the wheel to select a different Sampler Bank (will cycle through all available Banks)
Press the K3 button and use the wheel to select a Sampler trigger mode (On/Off, Hold, Stutter and Unmute).
Press the K4 button and use the wheel to adjust the loop of the triggered sample (move the wheel to the left to half the loop and to the right to bring it back to normal size). This will affect only the samples that are assigned to Loop mode from the Sampler Editor
Advanced Setup
The wheel of the Orbit is offering 2 different modes to choose, a relative mode and an absolute mode. The unit is pre-defined to use some specific modes for the wheel, depending on the K mode and the PAD BANK modes, but also gives you the ability to change this and use one or the other, depending on the actions you wish to change and assign to the wheel.
How to:
Open the Settings of VirtualDJ and go to the CONTROLLERS tab. Select the Numark Orbit and search for the ONINIT key. You then see in the action filed some parameters assigned to value 1. Value 1 means Relative and provides the ability to use the wheel as “Jog” or endless encoder. Value 0 (variable not present in ONINIT) means that the wheel is assigned as an absolute knob (aka as slider)
The variables have this form: $jogrelmAkB.
mA means PAD BANK mode A (1 to 4) and kB means K mode (1 to 4). So if you wish the wheel to operate in the Relative mode in PAD BANK 3 and K mode 2, you need to add …
set “$jogrelm3k2” 1 and re-launch VirtualDJ (or right-click on the Numark Orbit and choose Reconnect)
